Lately, everything in marketing is all about “data-driven” and “data-based decisions,” or my favorite, “there’s no place for sentiments, only data.” Then, someone asks me for an opinion about their Facebook Ads performance, and there’s nothing that helps make those “data-based decisions.” That’s why I decided to prepare this guide on how to use Facebook Pixel.
Placing a Pixel is the very
first step of Facebook advertisement. There’s no doubt about that. It’s in
every beginner’s guide to Facebook advertising, so it must be true, right? And
in this case, it absolutely is.
That’s the best way to find high-converting audiences, lower your cost, rescue abandoned carts, run cross-sales, and much more. I believe that after reading this post, you’ll have a ton of ideas on how you can tailor this knowledge to your needs. Enough of that, though, let’s get started.
Table Of Contents
- What is Facebook Pixel?
- Where to find Facebook Pixel?
- How to install Facebook Pixel?
- Check if your Facebook Pixel works
- Facebook events
- How to use Facebook Pixel
- And that’s it!
What is Facebook Pixel?
Just a few words of introduction for those who aren’t familiar with the Facebook Pixel concept: in simple terms, Facebook Pixel is a piece of code that allows you to track visitors’ actions on your sites and landing pages. It’s the same idea that stands behind Google Analytics and other tracking codes, for example. You place these few lines of JavaScript code prepared by Facebook on your website, and then the “magic” happens.
Now you know who’s visiting
your site and what’s his or her behaviors. What’s more important, you can use
this to improve your Facebook advertising and marketing in general.
How? In many ways, all depending on your goals and resources. First of all, you can track the journey of your customers, thanks to events (I’ll explain events later in this article). You can check how many people visited your site and what pages they visited.
Where to find Facebook Pixel?
Note:
If you already have a Pixel placed on your site, you can skip this part and
proceed to the paragraph about events.
You can’t start using Pixel without getting it installed. You shouldn’t even start running ads without doing that. The first step is, of course, getting your Pixel:
1. Go to Facebook Events Manager and click the “Get Started” button next to “Facebook Pixel: Track Website Activities.”
2. Set the name of your Pixel. As an option, you can add your website URL. Click “Continue”…
3. …and you’re done. You just created your Pixel, and it’s ready to use. Now let’s install it to gather some data.
How to install Facebook Pixel?
To start tracking actions on all your pages, you need to install Pixel on all of them.
I’ll show you how to install Pixel in three different cases. You can jump straight to the one that interests and applies to you the most, or go through all of them.
Let’s start with GetResponse landing pages. It’s super easy. If you’re running campaigns with dedicated landing pages, installing Facebook Pixel is a must. Next I’ll move to the most popular CMS – WordPress. Finally, I’ll show you how to install Pixel on other websites.
No matter what you go with, you need to start in the same place. Go to your Facebook Pixel overview and prepare your Pixel ID:
Add Facebook Pixel in GetResponse Landing Pages
Installing and using Pixel in GetResponse Landing Pages is really simple. Most of all, it’s also very beneficial. If you’re building a list, collecting leads, or selling with GetResponse, you should know how many conversions you’ve had.
1. First of all, you need a GetResponse account (if you don’t have one, try it here. It’s free!). If you have an account alredy, go to “Landing Pages” and create your page.
2. Once you created your page (or you already have one), go to settings and scroll down to “Analytics & Remarketing.”
3. Choose “Facebook Pixel” from the dropdown menu:
4. Copy your Pixel ID from the Event Manager on Facebook and paste it into the “Facebook Pixel ID” field, and click “Publish.”
5. Now you can track every visitor of your landing pages in GetResponse and use that data to tailor your campaigns.
How to add Facebook Pixel to WordPress
WordPress claims they are powering 35% of the internet. That means there’s quite a good chance that you are using WordPress as the CMS for your website. So how do you install Facebook Pixel on a WordPress site?
- First, download the Official Facebook Pixel plugin for WordPress. You can do that here: https://wordpress.org/plugins/official-facebook-pixel/
- Now, log-in to your WordPress account, go to the “Plugins” section and click “Add New.”
- Next to the “Add Plugins” headline is a button – “Upload Plugin.” Clicking on that will send you to the plugin upload page.
- Then simply drag and drop the downloaded .zip file or click “Choose File” and pick the Facebook Pixel plugin. After you do that, click “Install Now.”
- Only two more steps to go. WordPress is unpacking and installing the Pixel plugin. It should only take a second. When you see “Plugin installed successfully,” click “Activate Plugin” to switch it on.
- OK, we’re almost there. Now go to Settings and click on “Facebook Pixel.” The last thing to do is adding a Pixel ID. Copy it from your Event Manager (the place when you created Pixel) and paste it here. Click “Save Changes” and you are ready to go.
How to add Facebook Pixel to any website
I showed you how to install Facebook Pixel on your WordPress site and GetResponse landing pages, but you may use something different or even have a custom made website.
If you are using some kind of CMS or ecommerce platform (Shopify, PrestaShop, Joomla) there’s probably a plugin or integration similar to the WordPress one.
If there’s no such thing, you need to place Pixel in the code of your page. In the header to be specific.
Go to your Events Manager > Pixel Overview. Under the “Set Up” button you will find “Install Pixel.” Click it.
You will find two (in fact three) options here. “Use a partner” is something that you can use if you are using one of the popular CMS and ecommerce platforms I mentioned before.
So go there first and check if your CMS is listed. If it’s there, proceed with the instructions. If not, click on the “Install code manually” option.
Now you will see a green “Copy Code” button. It does what is says, so click it to copy your piece of pixel JavaScript code and paste it in your site header – just above the tag.
Recall I mentioned that there are in fact three options here. On every
popup window, there’s a link “Email Instructions.” If you have someone who is
taking care of your website, it’s possibly best if you email this person
instructions and all the necessary information. If you don’t feel like messing
with page code and are afraid you might break something, simply enter your
webmaster/web developer/page administrator email address and voilà, let them finish
the job.
Check if your Facebook Pixel works
It’s good practice to check if your tracking codes work. If you are using the Chrome browser, you can install Facebook Pixel Helper to check if it’s working.
If you have events (more about
those later) placed in the page source code, you will also see them here. You
can use it on any websites that have installed Pixels. That means you can also use
this tool to check what events your competitors are tracking.
Another option is to use the “Test Events” tool in the Events Manager. Paste the URL of the landing page that has installed your Pixel and click “Open Website.” Unlike the Pixel Helper Tool, that works only with websites that have your Pixel installed.
Facebook events
What is an event in the context of Facebook Pixel?
Whenever something is happening on your website, it’s an event.
- When someone views your page – it’s an event.
- When someone clicks a “Subscribe” button – it’s an event.
- When someone adds a product to the cart – it’s an event.
The only thing is that you are not tracking most of those things yet. That
will change now.
Set Facebook custom events without code
By default, Facebook Pixel is tracking only one thing – page views. That means Pixel is triggered (or fired) every time someone visits your site. And that’s pretty powerful stuff if you know how to use it.
But sometimes users do something but stay on the page. Let’s check that, for example.
Let’s say that you are selling towels online. Someone visits your store and hits “Add to cart.” Your super soft towel from Llama wool in size large is now in their cart. But hitting the button didn’t trigger any redirection. This person stayed on the same page, and maybe started browsing other products. To track this event, you need to do something that will trigger the event each time someone hits the “Add to cart” button.
I’ll show you how to set up both of these, so buckle-up!
Events based on URLs
- Go to your Pixel overview and click “Create Custom Conversion.”
- You will see a modal window with event settings. Your first item should be setting the conditions, so basically you need to choose which URLs should trigger the event. You can choose from 3 types of URL:
- Contains means that a typed-in word or string should appear in the URL.
- Doesn’t contain is the opposite of above. You can use it if you want to exclude some pages.
- Equals means that you need to type in the full URL and the event will be triggered only on this URL.
You can use “Add another rule” to build more specific conditions for your event. Each rule works as “AND.” If in the first rule you place “confirmation.html” and in the second rule “thank_you.html” the event will work only when someone visits those two pages.
On the other hand, if you put those two conditions in one rule, e.g., “contains: confirmation.html thank_you.html” then the event will be triggered whenever someone visits one of those sites. That means that inside one rule, there’s “OR” between every condition.
- Good news, once you go through that last step, the most difficult part is behind you! Now just name your event, add a description to “remember” what’s going on with this event, and choose the events category.
- This last thing is optional. If you want to assign a value to this event use the last field to track the conversion and ROI of Facebook Ads in the future.
And that’s it! You’ve prepared your first Facebook Event based on URLs.
Events based on button clicks
Using URLs for events is quite easy but will not always work. Also, Facebook has an even easier tool for setting up events based on link and button clicks that you should start using right away.
- As previously, start with Pixel overview. Click the “Set up” button on the right and pick “Set Up New Events” from the dropdown menu.
- You will see a modal window. You have two options here: “Use Facebook’s Event Setup Tool” or “Manually add event code.” Since this tutorial is no-code, we will proceed with the “Setup Tool.” Click on the grey area and paste the URL for the event you want to set up in the field that appears, and click “Open Website.”
- Facebook will open your website with small window on top that allows you to set events. As you can see, Facebook scans your site and gives you an event proposal. You can use that or click “Set Up Event.” Let’s do that second option.
- You will see a dropdown menu with various different events. Pick the one that best suits actions on your page. When you do that, click “Tag Your Event” and proceed.
- Now, Facebook will highlight all buttons and hyperlinks on your site. Click on the one that you want to track the event with. Note that if you have more than one button or hyperlink with the same text Facebook will count all of them in the same event, because text is how Pixel recognizes buttons for the event.
- Hang in there, we’re almost finished. Next you need to save your event with “Save Event.” If you want to set another event, you can do that recreating the previous steps. If not, click “Finish Setup.”
- Now you will see all the events that you’ve created. If everything is OK, click “Finish” and you will get back to the Facebook Pixel overview.
Great job! You just set up a click event without ever touching code.
Now, you need to activate your events. “Activate” means that you need to perform actions that you defined when setting the events such as visit specific pages, click on buttons or links. Of course, you can wait for website visitors to do so, but it’s better to check if everything works fine yourself before you start generating traffic to your page.
How to use Facebook Pixel
So, you installed
Pixel. Now what? You’re ready to start an exciting journey to the
data-optimized Facebook advertisement. In this chapter I’ll briefly describe
how to use data gathered by Pixel to improve your Facebook advertisement.
Conversion tracking
If you set up events, you can
use them as a Conversion goal. It doesn’t matter if it’s a specific URL or a click
on “Submit” or “Book a meeting” button.
For each ad that you are
running, you can check how many conversions (events) this ad causes.
Let’s say you are generating
traffic to your landing page with three different ads. You probably want to
know which one is better. Not which one is causing more clicks or reactions,
but which one is bringing more conversions. How can you do that? It’s simple.
Go to your Ads Manager and find the blue dot with a “+” at the end of a table. Click on it then click on “Customize columns.”
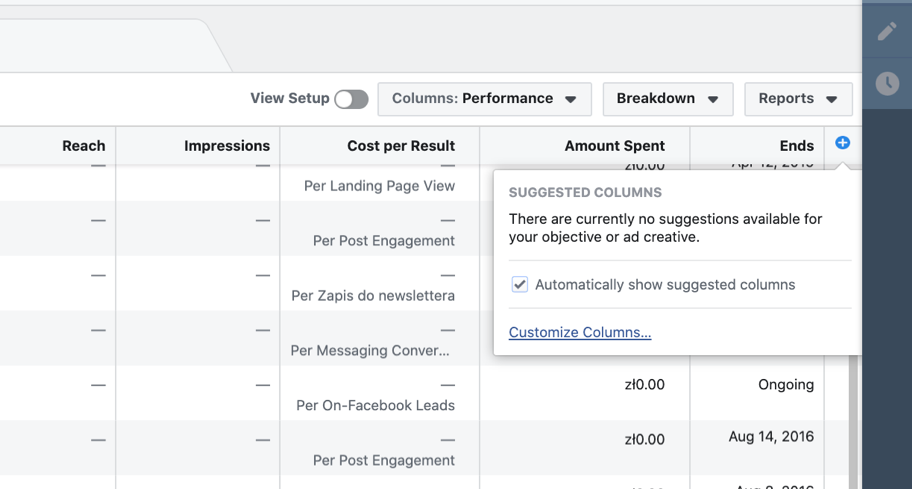
After that, you will see all the columns that you may add to your Ads Manager view. Under Conversions, you will see two types of data — “Standard events” and “Custom conversions.”
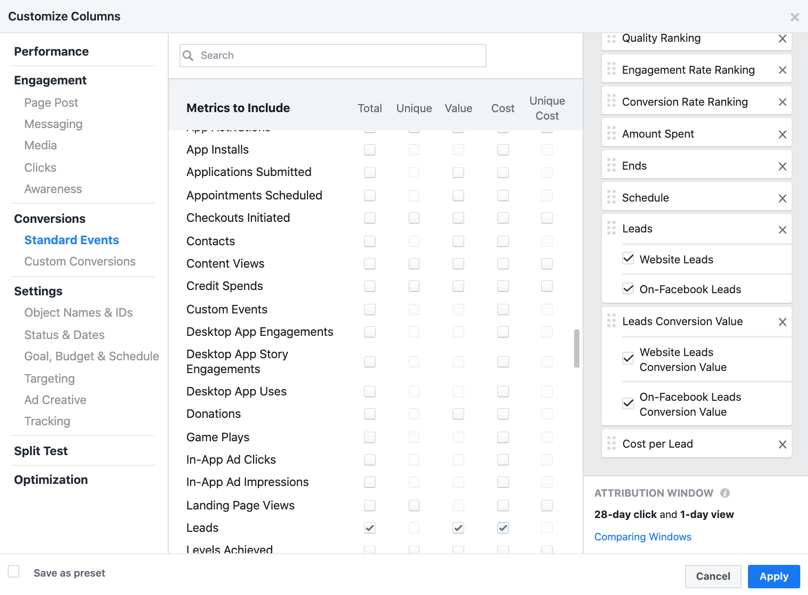
Let’s start with the second one. If you did what I’ve shown in this article in the Events based on URLs paragraph, you should see your event here under “Custom Conversions.” So Custom conversion is something that you named and defined with your conditions. It can be something simple like a visit to a “thank you page” or a more sophisticated build on a combination of many conditions.
Facebook defines “Standard events.” If you used the Facebooks Event Setup Tool, your events would be here. Simply find the name of your event (in our example we used Lead) and check which stats you want to display. When you do that, column names will appear in the right column. (Note that for the Lead event, there are channel-specific statistics. If you want only data for website leads, uncheck “On-Facebook…”. Those stats are for Facebook Lead Ads.)
Whatever you set up, after you checked the correct columns, click “Apply.” Superb! Now you can optimize your ads for your goals.
Check your reports frequently, find which ads bring you more conversions, and try to optimize them. Run A/B tests, play with advertising goals, formats, and targeting. Learn what your audience likes and use that knowledge. You now have hard proof that brings conversions.
Retargeting with Facebook Pixel. Custom and Lookalike Audiences.
Probably the most common case of using Facebook Pixel is retargeting. You can create a “Custom audience” based on “Standard event” (e.g., Lead) or use “Custom conversion” (e.g., event named “order-from-autofunnel” built on URL tracking). Use it to target people who performed those actions or, more likely, exclude them if they already converted (you don’t want to show your ads to people who recently bought from you or contacted you, right?).
You can use this data to find people on Facebook who have similar behavior. What does that mean? You have a Custom audience built from “Standard event” — Lead, a list of people who contacted you and now are in your autoresponder cycle with the ultimate goal of buying something from you.
You want more those kinds of people. So, you tell Facebook, “Here’s a list of people who are interested in my offer. I want more people like this.” Facebook checks this data and looks among users similar to those who already converted. The more conversions you have, the more accurate the lookalike audience is. It’s work in progress of continuous improvements from both sides, yours and Facebook.
You can find more on retargeting, Custom audience, and Lookalike audience, with a detailed description of what and how in this article:
The Ultimate Step-by-step Facebook Retargeting Guide
Facebook Analytics
The last thing I want to show you is Facebook Analytics.
If you haven’t heard about it, no worries, I have a feeling that lots of people haven’t. In simple words, Facebook Analytics is a Facebook version of Google Analytics with few tweaks. If you placed Pixel on your sites and landing pages, you could use it the same way you use Google. You have information about visitors and actions (events!) performed on your site.
Going deeper into how Facebook Analytics works is a vast topic for a completely new post. If you want to learn more, go to Analytics in your Business Manager.
And that’s it!
I hope you learned lots of useful stuff from my post. What more important, I hope you’re going to use this knowledge to your advantage. Implement Pixel, set up events, and use them to optimize your ads based on data that matters.