Automating
your marketing sounds like an overwhelming task that requires a lot of
technical skills. The truth is, it’s as complex (or as simple) as you make it.
Before you master marketing automation, taking the first steps is what counts. You’ll see it’s not as intimidating as it may seem.
If you don’t already know what marketing automation is and why you should use it, read What is Marketing Automation? first.
If you do know, but don’t know how to start, follow-through, and you’ll see how simple marketing automation can be.
Automation in marketing takes many forms. When marketers talk about automating their processes, they might mean anything from building conversion funnels, integrating apps so that they work together (saving their time), or creating workflows for their email campaigns to work automatically. In this guide, you’ll learn the essential definitions of email automation building blocks and simple workflows to achieve your business goals.
I’ll be basing this guide on the GetResponse Marketing Automation platform – a good marketing automation software should offer similar features. If you’re not GetResponse’s user already, sign up for a free trial and try it out!
Table Of Contents
- What you need before you start
- Basic marketing automation
building blocks - Creating workflows and using templates
- Achieving business goals with
marketing automation workflows - How to make the most out of marketing automation in 30 days
- Helpful resources
What you need before you start
Before you start, you need a few things for marketing automation to work for you. These are:
- at least one automation message,
- a landing page,
- and a registration form.
You don’t need to have an extensive list of contacts to start. In fact, it’s better to experiment with your first automation workflows on a smaller group of people, just in case there’s a small mistake here and there. So, if you’re nervous about testing on your customers, create a list with just a few emails, yours and your colleague’s, and you’re good to go.
Also, don’t stress if you don’t have enough data to begin with – your workflows can be set up in a way that they’ll collect valuable data that you’ll be able to use to boost engagement and conversions.
The final thing you’ll need is a good marketing strategy. Plan out what you want to achieve and what steps will be necessary to do it. This will keep your workflows straightforward and effective. Then, put the plans into action by building your first marketing automation workflow.
Basic marketing automation
building blocks
Marketing
automation consists of workflows that reflect your subscriber’s experience or
journey.
The simplest way to create a workflow is by using a pre-made workflow template. In GetResponse, there are dozens of templates you can choose from, depending on your goals and needs.
Although using templates is super easy, it’s best to familiarize yourself with the workflow’s building blocks first to understand how the template works and to be able to customize it.
You should also know that marketing workflows are stackable and modular, so you can start with two blocks and add more later.
There are three types of building blocks categories: conditions, actions, and filters.
Conditions
Conditions are
events that happened within your online environment triggered by your user’s behavior.
They’re also typically the X in the “If X, then Y”.
To build a
workflow, you need to define a condition first. When it’s met, automation executes
the workflow, and the contacts flow down the path.
There are various
useful blocks in this category, such as:
Subscribed via …, message sent, and landing page visited
These three are all starting conditions – they should be placed at the beginning of your automation workflow. They trigger the workflow for those you have selected for the condition. They only have a “yes” connector, which means they can only start the workflow for those who meet the criteria.
Subscribed via … –– this when the contact makes its first appearance on your list. You choose which list you’re focusing on, and the method by which they subscribed. For example, “somebody subscribed to my list called vip-customers via my landing page” or “I added a person to the my-dearest-friends list manually”.
Another
simple block is the “message sent” – it starts the workflow for the contacts to
which you sent a specific (or any) message.
“Landing
page visited” works the same way as “message sent”, but, of course, for any landing
page visited by the subscriber.
Link clicked and message opened
Use the “link
clicked” block when you want to determine if a subscriber clicked a link –– it
can be any link from any message, any link from a specific message, or a
specific link from a specific message.
The “message opened” block is pretty similar. It means the subscriber opened your message – any message, any newsletter/autoresponder/AB Test/automation, or a specific message.
After these blocks, you can choose different actions for both “yes, they clicked”/ ”yes, they opened” and “no, they didn’t”.
Special event
(Also a
starting condition)
Special events can be set for any date custom field you have in your account. It
can be the contact’s birthday, their subscription date, anniversary, etc. You
can choose when to trigger the next step (the other building block’s action) ––
immediately, before, or after. Also, decide if you want it to be a one-time event
or if it’s supposed to be active every year on the same day.
Custom field changed, contact copied to list and contact moved to list
“Custom
field changed” works for any change that happened to any type of custom field,
whether the change was applied by you or the contact themselves.
“Contact
copied to list” and “contact moved to list” are useful when you want to add
contacts to your workflow when they’re copied from or moved to a different
list. It’s important to note that the contacts need to be copied/moved by API
or a different workflow.
Ecommerce tools – purchase, abandoned cart, billing status changed
These four
blocks are extra useful for ecommerce stores.
“Purchase”
lets you apply the condition to any purchases from your stores. If you integrate
your store with GetResponse, you can do it either with API or install a
specific JavaScript on your website. If you integrate with JavaScript, you enter
the after-purchase thank you page’s URL to track. If you connect via API, you
select conditions for the purchase you want to follow. For example, you can set
it to work like this: “Whenever a purchase of item X, variant 3, for more than
100 USD is made at my store Store4 (…)”.
“Abandoned cart” lets you choose the number of days/hours after which you assume the cart in your store was abandoned. It’s a perfect block to use in cart abandonment email series to get your customers to convert.
“Visited
URL” lets you see if the subscriber visited a site of your choice. (You need to
install JS code on the URL you want to track). It can be useful, for example,
to score or tag contacts that visited a link you sent them via email.
“Billing
status changed” allows you to take steps after the billing status from any of
your stores has changed.
If tag…, If score…
These two conditions let you take the next steps for contacts that have been assigned a given tag or have reached a number of points in your workflow – but, more on that later, when we get to “score” and “tag” action blocks.
Actions
Actions are
the essence of marketing automation. It’s what happens when the condition is met.
Here’s what
they do:
- Send message: Although the name is self-explanatory, there is one thing worth mentioning: the message sent will be a marketing automation message. It’s a type of message used only as an action. The difference between this and any other message you use is that the email gets sent as a result of all the conditions and filters you set up in the workflow – you don’t use standard settings to determine when the message is sent. You can create a marketing automation message specifically for the purpose of your workflow or copy the content from any message you have already created.
- Custom field: With
this action block, you can assign a custom field and its value to your contact
or remove an already existing custom field.
- Copy to list; move to list: These block copy/move the contact to
another list, with the option to add them to a custom day in the autoresponder
cycle, or don’t add them to the other list’s cycle at all.
- Copy to workflow; move to workflow: If you copy contacts to another active
workflow, they complete two workflows at a time. If you move them to another
active workflow, they will complete only the one you moved them to.
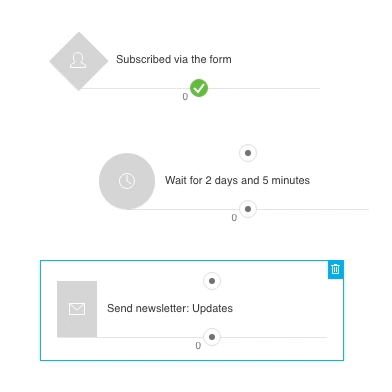
- Wait: Temporarily stops contacts from moving down your workflow. It’s best used before other actions to time them.
- Remove contact: Removes the contact from any given
list, autoresponder cycle, entire account, or current list and workflow.
- Score: Adds a number of points to your contact for completing an action. For example, if your lead opened an email, you can give them 5 points; if they clicked a link –– 10 points, etc.
- Tag: Assigns a label to your contact. It can be anything you set it to be, but it’s great for tracking customer engagement, for example: active, inactive, engaged, not_engaged, etc. You can create tags as you go, but it’s best to have a basic tagging plan set before you begin, so think about who you want to tag, how, when, and why.
Filters
Filters create segments that help you target more specific parts of your audience. They should be used as the object of an action (e.g., if you want to send a message, which is an action, and you want to send it to first 100 contacts, you use an “Amount” filter)
The filters
you can use in your marketing automation workflows are:
Range
You chose up to 6 different ranges of contacts, for example, every hundred people, and you can choose a different action for each range. In the picture below, you see a block with six set-up ranges and six connectors, each representing a following range of contacts.
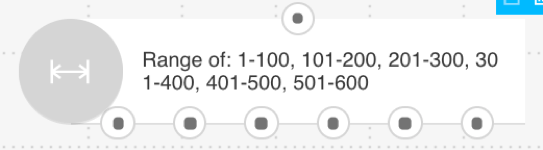
What you want to do with contacts from each range is up to you and the actions you connect to the block.
Amount
This block lets you choose how many contacts to reach with the next action, e.g. if you want to send an automation message to the first 100 contacts that subscribed to your list and assign a different action to all the remaining contacts after the 100 mark.
Example: You can set the range to 100 contacts and send them a discount code.

Dynamic segments
Dynamic segments
allow you to target specific segments of your list, using segments you have
already created, or by creating a new, workflow-specific, segment.
You can adjust
properties of this block to segment your contacts across all lists by adding
multiple conditions or condition groups.
Lists
The “Lists” block can search through your lists in two ways. The first way is sorting contacts by the list they’re in – searching by their ID. If your workflow starts by contacts subscribing to any of your lists, you can use this filter to perform an action only on people from one specific list.
The other
variant is searching for contacts in all your lists using their email address,
to see if they appear on more than one list. You can then perform different
actions for people who are duplicated in your account, and people who are subscribed
to one list only.
Consent status
If you have
created at least one Consent Field, you can then sort your contacts in the
workflow by their consent status. For example, if they agreed to you sending
them marketing communication, you can proceed with sending messages, connecting
a corresponding action to the “yes” connector. If they haven’t given consent, or
have withdrawn it, they’ll go down the negative path, so you can use the “no”
connector to tag them as “no_consent” or even delete them from your list to leave
only consenting contacts on it.
Only unique contacts
This is the
simplest block to use, as it’s not configurable. It filters out duplicate
contacts on your list, so you don’t have to worry about sending multiple
messages to the same contact more than once.
Splitter
The “Splitter” block is perfect for when you want to test different automation messages. Or, just test two marketing strategies, sending contacts down two varying paths. You can choose the percentage of people that will land in path A and in path B, and they will be randomly distributed. It can be any split, but consider the most popular 50/50 for the most reliable test you can then track in your statistics.
Whew, that was so many blocks to know! But don’t worry, for most simple workflows, especially the first ones you create, you won’t need as many of them. Start with two blocks –– one condition, one action and expand later. Remember, marketing automation is only as complex as you make it.
Creating workflows and using templates
Now that you know all the building blocks, it’s time to learn how to connect them.
First, open your automation workspace. In GetResponse, you’ll be able to choose if you want to start from scratch or use a template.
Here’s a quick overview of using templates to build workflows.
But, for now, let’s say you chose to work from scratch.
When you enter the workspace, you’ll have to name your workflow and pick a starting block.
You can drag and drop the blocks into the workspace. The blocks have connectors from which you can drag a line to a connector of another block. You’ll see that some of the blocks don’t have the connector on top –– these are starting blocks that should be placed at the beginning of your workflow. When a condition block has two connectors at the bottom, a green and a red one, it will divide your workflow into two paths, one for the contacts that meet the requirements, the other for those who don’t.
You will
see how many contacts pass through the condition blocks at all times.
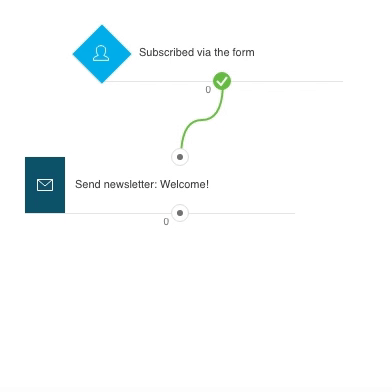
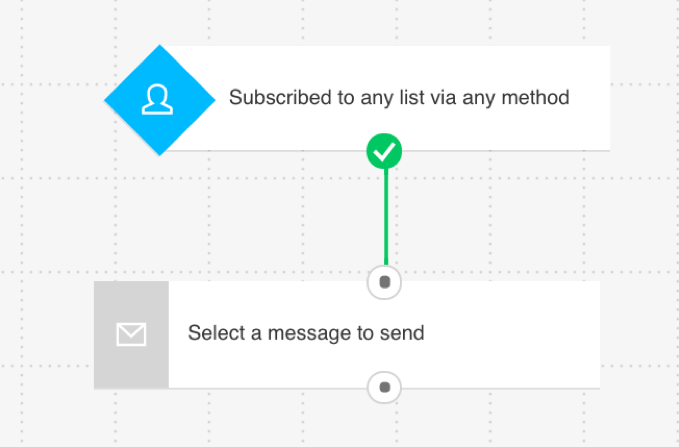
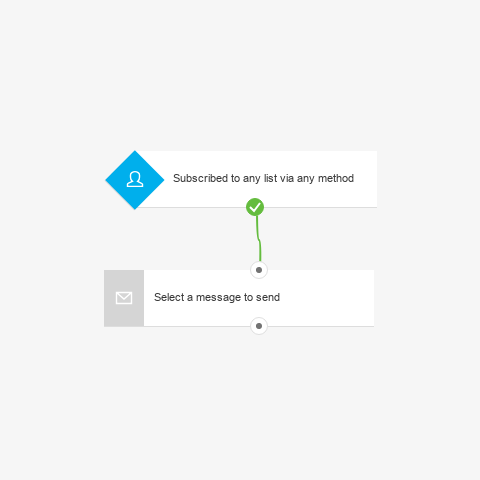
The picture below shows the simplest workflow to build. It can be used in many ways, but its most popular use is as a welcome email cycle. “If a person subscribes to any list, send a message.” Select a message to welcome your new subscriber, and voila! It’s a full welcome sequence.
Now that you know how building automation workflows works, let’s see it in a more practical light. Following the marketing automation examples below, you’ll learn how to construct workflows that help you meet your business goals.
Achieving business goals with
marketing automation workflows
There are two main reasons to start automating your marketing, and they always go together. It’s wanting to save time and achieving more business goals faster. So, here are some simple workflows categorized by goals they will help you achieve. Read on and see what works for you.
Contact list building
If you want to make money through email marketing, building a contact list is a constant top priority goal. To acquire a high-quality crowd, you need to make sure you offer a high-quality experience.
Simple welcome message
Make your subscribers
feel welcome and start with a simple welcome email for each new subscriber.
Then you can expand and send welcome email series that offer value to your
target audience and gradually make them ready for making an informed purchasing
decision.
Let’s say
that people land in your contact lists in lots of different ways – they fill
out a form on your landing page, you add them manually, etc. You want to
welcome them all with equal joy. Lucky for you, you only need two blocks for
that, and I’ve already mentioned this workflow in this article as the simplest
one! You can also use a template for this. It’s “Simple welcome message.” You
then set the parameters of the condition to “subscribed to any list via any
method,” and create or select a welcome email in the “Action” block.
Here’s an example of a welcome email:

Welcome email series
A great
welcome email is crucial for the overall email marketing experience you’re
offering. But it’s not possible to include all the important information in a
single message and maintain a clear conversion goal.
That’s why
it’s a good idea to plan an email series where each message is designed with a
separate CTA in mind.
An email series also makes it easier to collect valuable information about your contacts’ information needs and preferences. You can use tags and scoring to track user behavior and optimize further communication flow.
For welcome email series, you need to add blocks after the first action, e.g., another condition like “message opened”, then “wait” set to however many days you feel are appropriate, then another “send message” block, and so on.
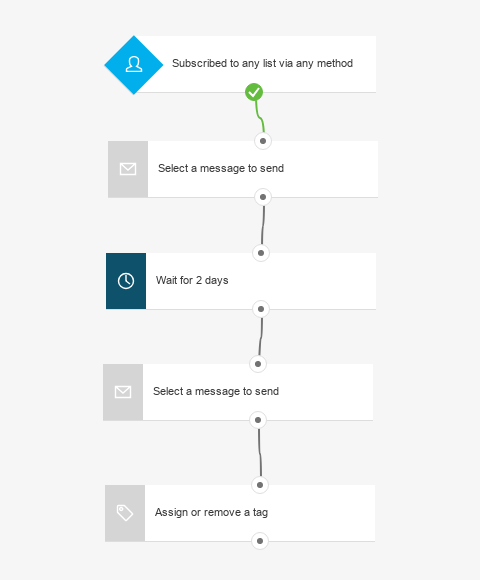
You can use welcome email series to run short onboarding and education campaigns for your contacts.
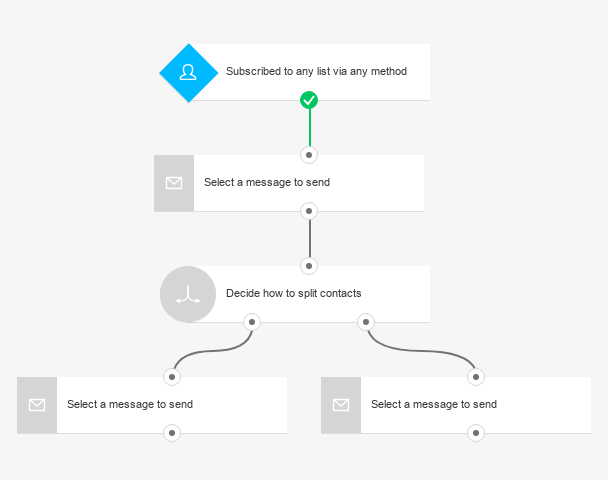
Simple contact split
Every time you
want to test your communication on two groups of contacts and check the results,
use the Splitter filter to split
your contacts into different customer journeys.
If you apply the splitter after a given action, the rest of the workflow can look completely different for each percentage of people. You decide how to split them, for example, 50%/50%, and what messages you send afterward.
Lead nurturing and retention
Most email marketing programs are aimed at assisting the contact on the journey from a prospect to a satisfied customer that keeps coming back. If you want to make it successful, you need to keep your contacts engaged for a certain period of time. This will exponentially increase their LCV (Lifetime Customer Value).
Rewarding loyal contacts
You can assign scoring points based on user behavior (e.g., email opens, links clicked, URLs visited) and send custom emails to your most engaged contacts.
The emails you send to contacts with higher scores can be anything from thank you messages to special promo codes.
Contact retargeting
Relevance is key to engagement. It basically means that people will open and click the links in your emails as long as they find them valuable.
You can
design your email templates to encourage contacts to read other related offers.
Then you can create a workflow that sends a message suggesting expanded offer
based specifically on contacts’ interests and behavior.

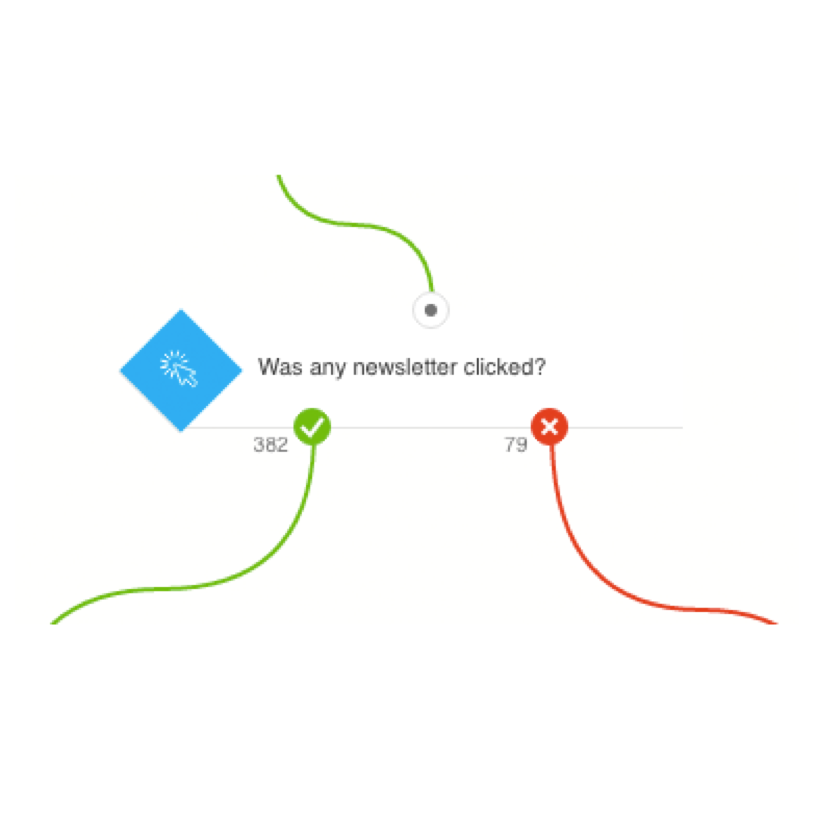
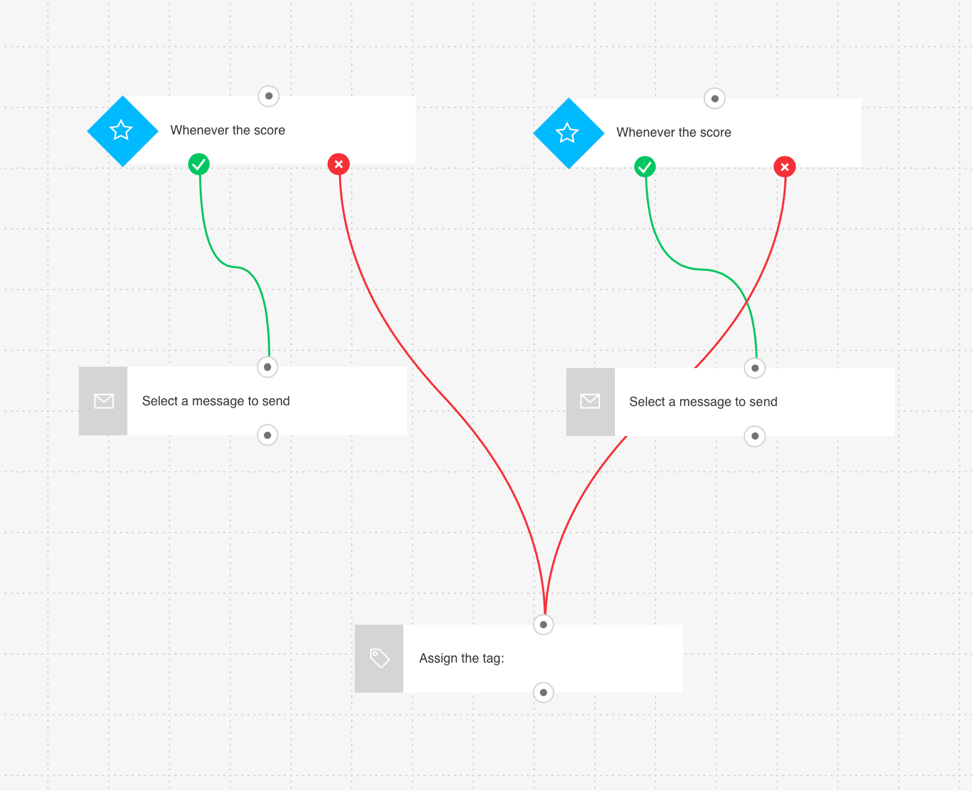
If you need better lead management, make room for active contacts on your list and remove the inactive ones, consider tagging your leads based on their score. That’s what the automation workflow below is built for:

When your contacts click on your links, open your emails, give them a score. There’s even a specific template build for a basic scoring plan if you don’t want to put scoring elements in other workflows. Then, to maintain list hygiene, use the workflow above – tag the engaged contacts with a higher score, as engaged customers or warm leads. Tag them differently (inactive, cold, etc.) when they do not interact with your campaigns, therefore not reaching the necessary threshold.
This simple tagging system can be of great help when you have an exclusive offer you want to pitch only to your superfans. It all depends on the number of points you set in the “wait until the score is greater than…” block.
Read more about 6 Lead Scoring Techniques You Should Use with Marketing Automation.
Sales
When you sell products online, you need a system that will take good care of your customers post-purchase, send thanks and assure them about the status of their order. Also, you need to encourage them to visit your site often, ultimately purchasing more.
Lucky for you, that’s what marketing automation tools are here for!
Cart abandonment
This simple workflow lets you send a follow-up message to customers who have placed items in their shopping cart but left without purchasing them. This will reduce the number of incomplete orders and remind customers to come back.
You’ll need to prepare an automation message with a reminder. And for the Abandoned Cart to work, you’ll need to connect your store with GetResponse via API or JavaScript.
If you want to include the items from the cart in your automation message, you’ll want to enable sending new ecommerce data to GetResponse or export existing ecommerce data to your GetResponse account. Then, while creating the message, use an Abandoned Cart block in the email creator – and voila!
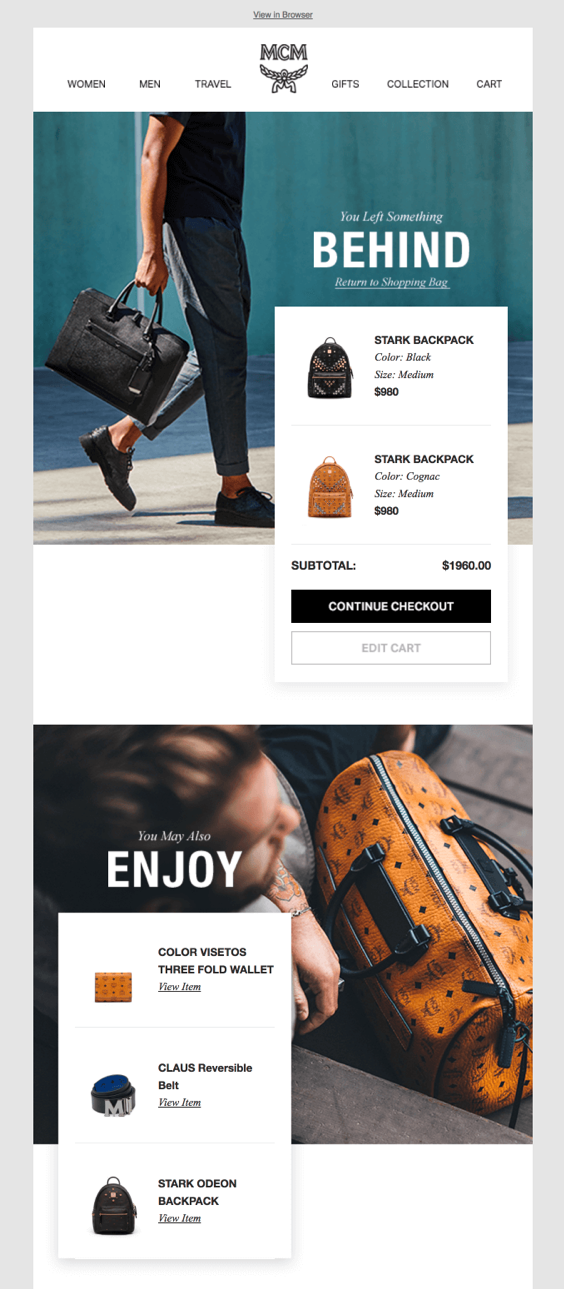
An abandoned cart automated message can look like this:
See 6 Rules to Recovering Abandoned Cart Emails for more tips and inspiration.
Post-purchase follow-up
Speaking of abandoned carts, you don’t want your customers to feel like they’ve been forgotten and bought a product or service from a void that doesn’t respond. But, of course, you don’t have to follow-up manually to make the emails personal.
You can set up a post-purchase follow-up template that looks like this:
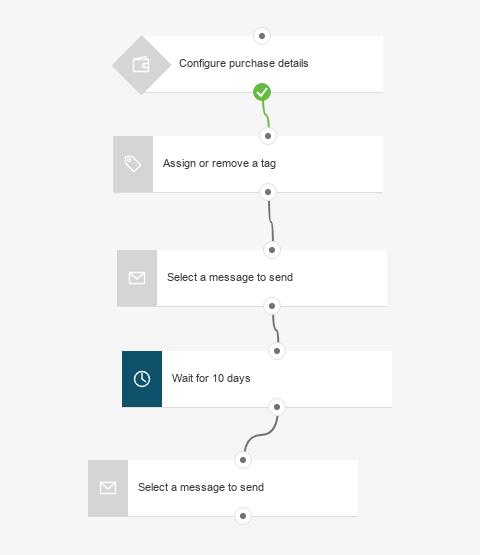
After a purchase is made, tag your customer based on the purchase – it will help you in future campaigns. Then, send them a thank-you email!
After ten days, you can follow-up with a message presenting other offers from your store, or other deals the customer might like.
It’s very simple but it will go a long way. The customers will get more engaged with your brand in no time, and you will have a lot of time to yourself when the whole process is automated.
How to make the most out of marketing automation in 30 days
If you’re thinking about trying out marketing automation for yourself, a free trial in GetResponse is the best way to do this. You’ll have 30 days to make the most out of it. How? It’s easy, let me explain.
- When you sign up, start with creating a landing page.
- Put a contact form in a visible place on the landing page.
- Publish the page and post the link to it on your social media – let your friends and family sign up to your list.
- Using our email creator, make an automation message that will welcome your new contacts.
- Then, set up a workflow consisting of only two blocks – “subscribed to a list via any method” and “send a message”.
And that’s only day one! You’ve got 29 more days left to start generating conversions!
- Analyze the results of your first automated email, taking metrics like open rate and click-through rate into account.
- Think of your goal and see if any of the workflows suggested in this article applies to what you want to achieve. Look at other templates built for you in GetResponse. If you want to try something different, try building a workflow yourself using your fresh knowledge of building blocks.
- Experiment and test your workflows – it’s even easier when you’re just starting out because you can do pretty much anything without any big risks.
- Analyze your tests to see what works for your brand and what should be tweaked.
- If you want to know more, don’t be afraid to ask for help. Also, look into our FAQs, look for inspiration in resources, and check out more articles on our blog. This will take you on a journey to become a marketing automation expert.
Are you ready to try automating your marketing?
Helpful resources
If you want to learn more about this topic, here are some great reads we recommend:
- What is Marketing Automation?
- GetResponse Marketing Automation Help & FAQs
- Marketing Automation 101 – a collection of resources
- 30+ Automated Email Responses You Should Send Today
- 5 Marketing Automation Workflows to Skyrocket Your Ecommerce Conversions
- Quick Guide for GetResponse Marketing Automation Planning & Implementation
What are your thoughts on marketing automation? Do you have interesting tips for people who are just starting out? Let us know in the comments below!